Wednesday 30 November 2011

THE LAWN


THE OLD LAWN                                                                                              


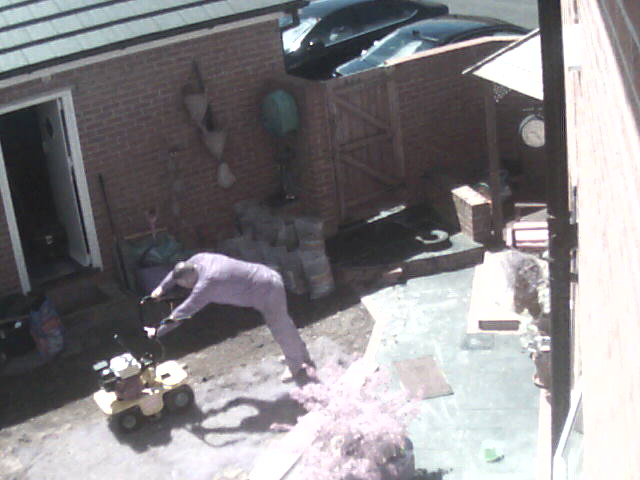
First things first dig up old lawn I did hire a turf remover but ended up doing most of it by hand. Well I know for next time.


The ground was 12 inches to high toward the garage and 3 inches to low the other end so I needed to remove about a ton of earth.


We packed 96 bags of stones and old turf


I made a riddle three feet by four feet out of 3 x 2 and chicken wire then set it at 45 degrees and made a ramp to wheel barrow the soil in at the top.


My master plan was to dig out all the soil and riddle out the stones,this would reduce the amount of good soil going to waste and give me high quality topsoil for my nice new turf.


We then spent several days rolling and raking to get  it truly level.


A drum of chicken manure to spread before laying the turf.


Finally it was ready for the turf. I ordered 52 square meters for the coming weekend.


Lush quality and three feet wide easy to lay. Using the scaffold plank to keep the rolls straight.


The finished item level and green.


I had to include my nine feet sunflower Berty.


Saturday 26 November 2011

FLAT SCREEN ON THE WALL

   
From this....  


  To this.....


In new houses is the walls are made from soft Thermalight blocks and there is a 20mm ish cavity that you need to pack out to stop the bracket collapsing into the plaster board.


So l marked out the wall bracket checking that there is no water pipes or electric cables running behind.


Using a hacksaw blade cut out the hole. Then measure the cavity and cut three pices of wood  to cover the area where the long screws go through. Making sure to drill through the center of the wood.


Use a old wire coat hanger to pull some nylon string down inside the cavity to the old electric socket. Tape this string to some 2.5 cable and pull up.Remove the single socket and replace with a round junction box.  


Connect the supply to the new length of cable. This will enable you to feed a pair of double socket's behind the TV.

Fill and sand the area.Work out the best place to where the sockets will go that will not stop the TV sitting flat.


Replace the plaster board cut out and fit the wall bracket.Check for level put the TV on the wall bracket to check fitting.


Fit the second part of the bracket to the TV with the screws provided. Make sure they are not too long and cause damage to the TV. Mark the wall where the shelving bracket will start. This will be just under the bottom of the TV drill and fit top bracket.

Pull all cables through back of the shelving unit positioning each cable set for each shelf.


Friday 25 November 2011

THE DECK


A deck for her in doors.


From this....
To this...


Remove excess soil for frame to sit level and dry. Try and keep the ground flat and level with a slight tilt to drain water.


Lay frame work level along the front as the intention is to have the water to run toward the path. I always have 1" drop over 10 feet just to stop water gathering and freezing in winter.


To incorporate the Herringbone design I wish to use we need to construct a double support for middle joint. This will enable solid fixing on the ends of the deck-boards. (plastic sheet over my electrics)


Plenty of noggins for a good sound job.


Start adding boards from the center this will allow you to easy set the pattern at 90 degrees using the 3-4-5 method. To get a accurate 90degree triangle use the following technique, one side of the triangle 3ft long the other at 4ft long an the last side will be 5ft. If you need to use this on a large base  any multiple of 3-4-5 will work. like 6-8-10 or 9-12-15.


The good thing about starting in the middle is the off cut from the big boards fit in the smaller ends thus getting less waste per board. Also with the herringbone pattern you only have to cut one end of the majority as they interlock with each other in the center.


Always re apply treatment when you cut the end off the board as the pressure treated part has been removed by cutting and drilling. I used End Coat to maintain the integrity of the pressure treatment.


Jobs a good un.